
前言
一句话概括一下ascon加密算法,它是NIST(美国国家标准与技术研究院)在凯撒加密竞赛中评选出最新的适用于IoT的一个加密算法家族。
既然他是一个算法家族,那么肯定不止一个算法,准确来说是参数不同,算法过程基本相同。请看基本介绍
更多关于ASCON的知识,请看这些网址
- 官网
- 谷歌学术-提交给凯撒协会的论文
- 谷歌学术-提交给凯撒协会的PPT
- 谷歌学术-ASCON论文
- 提交给NIST的论文
- 官方的组织GitHub
- Martin Schläffer的GitHub
- Maria Eichlseder的GitHub
除此之外,可以看下面的源代码库:
Python版本的,由官方人员编写,Ascon-PythonJava版本的,由官方人员编写,Ascon-JavaC版本的,由官方人员编写,Ascon-CC++版本的,由我编写,Ascon-C++
基本介绍
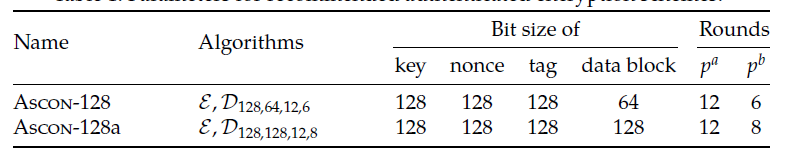
参数推荐
先跳过这一部分,可以看下面的,之后过来查。官方推荐是ASCON-128 + ASCON-HASH组合更好一点

符号介绍
这一步分也先跳过,看后面的,之后过来查
| K | 密钥,长度(提交给NIST的论文说是160bits以内,而谷歌学术-提交给凯撒协会的论文确实128bits以内,我没有确定好是哪一个) |
|---|---|
| N | 随机数,128bits |
| T | 标志,用于认证的,128bits |
| P,C,A | 明文P,密文C,相关数据A(用来身份认证的,可以是身份ID,IP地址等等),数据长度均不固定,因此需要填充(padding) |
| M,H | 消息M,哈希值H |
| ⊥ | 代表认证错误,密文认证错误等 |
| S | 海绵结构的320bit状态S |
| Sr,Sc | 状态S的rate和capacity部分,一个S是320bits,前面r比特是,后面c比特是, |
| 全排列过程,见过程 | |
| 比特流x,长度k(如果k是*的话,表示长度是变量) | |
| 比特流,长度为k,值全0(如果k是*的话,表示长度是变量) | |
| |x| | 比特流x的长度,单位是bits |
| 将比特流x截断,只取前k位 | |
| 讲比特流x截断,只取后k位 | |
| x||y | 比特流x与比特流y拼接起来 |
| 比特流x与比特流y异或 | |
| x除以y的余数 | |
| 向上取整 | |
| 上述过程分出的三个子过程 | |
| 状态S五组64bits的数据,状态S是320bits,分为5组,每组64bits | |
| 表示上面五组数据中的第i位,比如表示的第52哥数据(从0开始),其中表示最右边的那位 | |
| 同或 | |
| 比特流x循环右移i位 |
加密/解密流程
Initialization:初始化Processing Associated Data:处理关联数据A的过程Processing Plaintext/Ciphertext:处理明文(加密)/密文(解密)的过程Finalization:终止化
除了上述流程以外,还要介绍两个子过程,一个是填充Padding过程,一个是全排列过程Permutation(简称 p过程)。
下面是流程图,看不懂也没关系,我也没看懂
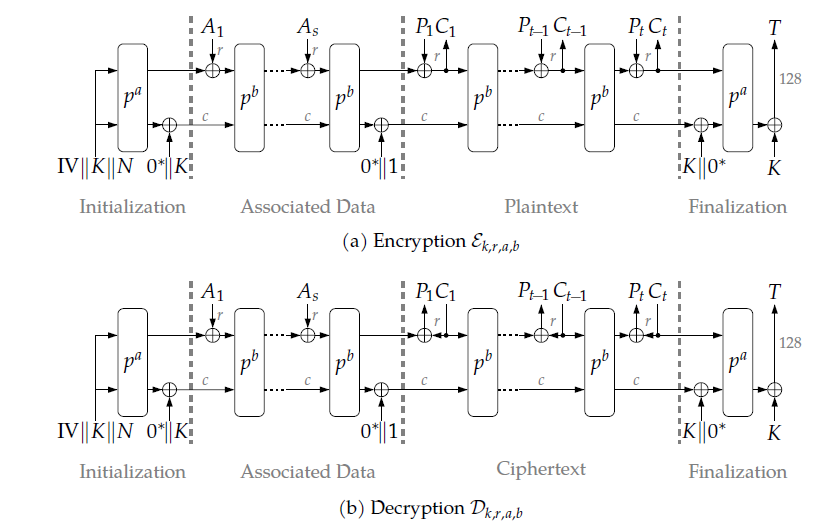
注意:该种结构称为海绵结构,从头到尾只有 **状态S ** 在迭代,状态S是固定的320比特数据,关联数据与明文/密文只是在状态S迭代过程中进行处理的数据而已。最后会生成一个标志T,加密方将标志T给解密方,解密方使用标志T来验证是否解密成功。
下面两个公式无关紧要:
其中公式(1)代表是,加密过程,预设参数a,b,k,r,我尚且没有找到合适的参数。输入的是K,N,A,C,T,请看符号介绍,公式(2)是解密过程,参数同理。
过程详解
因为填充和全排列可能会在过程中遇到,所以想先讲讲这两个怎么实现吧,注意,下面所有的过程都是以ASCON-128和ASCON-HASH作为讲解。
填充Padding
注意:填充过程是对明文、关联数据以及哈希数据填充的过程,关联数据A有可能为空,为空就不填充。除空之外,填充方法其实都是一样的,填充一比特1,填充若干比特0,直到长度为r的整数倍,r其实就是data block,这里是64。

以明文举个例子,需要对明文填充一个1和个0,然后再将整个拼接好的串分为t组,每组rbits,关联数据A同理可得。密文是不需要填充的,因为填充的部分也不会用到。
全排列Permutation
全排列Permutation过程,简称过程,与只有次数的区别而已,表示执行m次p过程。
过程由三个过程组合而成的。
注意:过程是处理状态S的过程,前面有介绍状态S是什么。
- 下面是对状态S的两种分组过程


- 分组:上述两图,一个是分成64组,一个是分成5组。
- 增加常量:分成5组。只操作,常量为,使得,常量选择见下图(常量其实是有规律的,高四位是由F递减,低四位是由0递增)
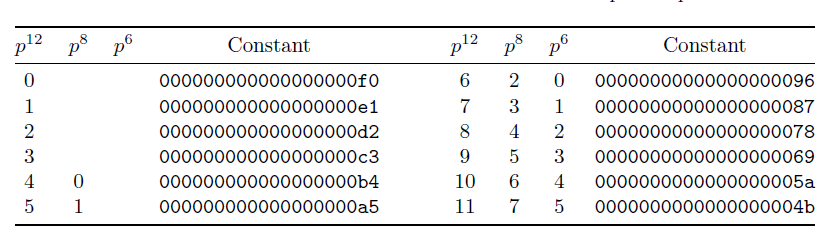
- 增加常量:可以简化成下列公式
- ,其中或者 ,这取决于执行次数,前者是执行6次,后者是执行12次。
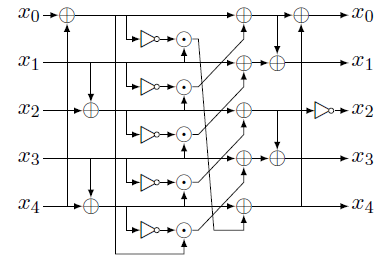
- 替换:原理介绍 (实现过程中一般不看这里,这里只是原理)
- 按照分成64组的分法,每5
bits为一组,按照下表进行替换。
- 按照分成64组的分法,每5

- 替换:简化替换,以便数字电路也能执行,这里依然是分成5组的方法
- 使用下列数字电路进行替换,方便在FPGA上实现,同时给出了公式(公式中的代表是临时变量)
- 线性扩散:依然是分成5组。注意是循环右移,而不是单纯的右移
初始化Initialization
- 状态S的构成,状态S是320
bits:,注意这里是没有数据(明文、密文/关联数据)的 - 介绍上面的
Ⅳ:如下图所示,我们还可以知道k,r,a,b分别是多少,其中k=128,r=64,a=12,b=6,Ⅳ总共是占64bits

- ,其中请参考上述过程,注意执行轮次有次
处理关联数据Processing Associated Data
- 由填充数据中知道,关联数据A需要被分成s份,每一份是
rbits - ,注意次,代表的前个
bits,代表的后个bits,其实的长度没有变的 - 轮执行完之后,需要一下
处理密文/明文Processing Plaintext/Ciphertext
加密
- 由填充数据中知道,明文P需要被分成t份,每一份是
rbits。其中r=64 - 对于 时
- ,其中 表示状态S的后c=256比特数据
- 对于 时
- 对于最后一个密文块需要特殊处理:截取前几位,舍弃后面的
- ,其中
- 这是因为明文是填充过的,如果不截取前几位,那么密文有可能比明文长,所以需要截取前 位数据
解密
- 密文不需要填充,但是仍然分成
t组,除最后一组外每组r=64比特,最后一组是比特。 - 对于时
- :将状态S前
r比特替换成,然后执行过程
- 对于时
- :这是因为的长度只有比特了,因此只需要用的前比特就行。
- :这里其实就是把状态S前比特替换成,将第比特与
1异或。
终止化Finalization
- 加密过程中,返回标志T和密文
- 解密过程中,返回标志T和明文,但是只有当计算的表示T和收到的标志T匹配才有效
哈希过程
哈希过程另外开了一篇博客讲解,请移步至Ascon-Hash过程详解。
综合讲解
看完上面的过程详解之后,应该能够看得懂下面这张图了
最终的实现都是需要根据这一张图片来的,但是现在估计有很多疑问吧,请看下面吧
输入参数讲解
- 密钥
K就不说了,就是你的密码 - 随机数
N,这个也没啥好说的,用一个东西产生随机数即可 - 标志
T,用来验证解密是否正确的,由加密方提供给解密方 - 明文/密文
P/C,这个更不用说 - 关联数据
A,这个是什么呢?相当于你的账号,然后密钥相当于你的密码
代码实现
本章节实现AsconV12,主要是为了讲解如何实现,使用的语言是C++。
可以去我的GitHub仓库使用完整代码
定义数据类型
明文,密文和关联数据都涉及两个数据类型
- 一个数据类型是用户接口的,为
ascon_data,外部进行传参 - 一个数据类型是内部实现,考虑到实现过程中需要将明文,密文和关联数据进行分组,分成 若干组,每组
64bits,参考填充章节
状态S,则只有一个类型
- 状态S定义为
ascon_state,它大小固定,为5行,每行都是一个64bits的数据
随机数与标志都是使用自定义的ascon_128,因为他们是固定的128位
- 在状态S中是占两行
#include <vector>
// 定义单个字节数据,C++实现并不是使用bit作为最小数据单位。
using ascon_8 = unsigned char;
// 定义64bits数据。
using ascon_64 = unsigned long long int;
// 定义明文,密文和关联数据原始类型。
using ascon_data = std::vector<ascon_8>;
// 算法运算过程中,定义状态S的数据类型。5行,每行64bits
using ascon_state = std::vector<ascon_64>;
// 算法运算过程中,定义明文,密文和关联数据类型。行数不知,每行64bits
using ascon_padding = std::vector<ascon_64>;
// 定义 Permutations 的类型,分为a和b
using permutations_type = int;

// 实现一个128位的类,原型如下,可以选择把数据设置为私有类型
// 实现思路:使用两个64位数据组合而成
class ascon_128 {
    public:
    ascon_128();
    ascon_128(ascon_64, ascon_64);
    ascon_64 high, low;
    void copyto64(ascon_64& a, ascon_64& b) const;   // 复制到两个64位的数据中去
    void xorwith64(ascon_64& a, ascon_64& b) const;  // 异或到两个64位的数据中去
    void showhex(std::ostream& out) const;   // 以显示十六进制显示
    bool operator==(const ascon_128& tmp)const;   // 判断两个128位的数是否相等
};
// ascon_128 实现如下:
ascon_128::ascon_128():high(0), low(0) { } // 默认初始化为0
ascon_128::ascon_128(ascon_64 a, ascon_64 b) :high(a), low(b) {}

void ascon_128::copyto64(ascon_64& a, ascon_64& b) const {
    a = high;
    b = low;
}
void ascon_128::xorwith64(ascon_64& a, ascon_64& b) const {
    a ^= high;
    b ^= low;
}
void ascon_128::showhex(std::ostream& out) const {
    out << std::hex << high << low;
}
bool ascon_128::operator==(const ascon_128& tmp)const {
    return (tmp.high == this->high) && (tmp.low == this->low);
}
定义常量
// 定义常量数据
// 注意:下面的数据类型我都定义在一个类Asconv12里面
// 注意:因为为了我之后能够移植到C语言,所以并没有定义成员变量,并且都是定义的静态成员和函数
class Asconv12 {
public:
    Asconv12();
    static void encryption(
        const ascon_data& plaintext,
        const ascon_data& associatedData,
        ascon_data& ciphertext,
        const ascon_128& keys,
        const ascon_128& nonce,
        ascon_128& T
    );
    static bool decryption(
        const ascon_data& ciphertext,
        const ascon_data& asconciatedData,
        ascon_data& plaintext,
        const ascon_128& keys,
        const ascon_128& nonce,
        ascon_128& T
    );
private:
    static void padding(const ascon_data& data, ascon_padding& out, bool need = true);
    static void permutations(permutations_type t, ascon_state &S);

    // 循环右移
    static ascon_64 ROTR(ascon_64 d, int n);

    // 过程
    static void Initalization(ascon_state& S, const ascon_128& keys, const ascon_128& nonce);
    static void ProcessingAssociatedData(ascon_state& S, ascon_padding& A,
                                         const ascon_data& associatedData);
    static void ProcessingPlaintext(ascon_state& S, ascon_padding& P,
                                    ascon_padding& C, const ascon_data& plaintext,
                                    ascon_data& ciphertext);
    static void ProcessingCiphertext(ascon_state& S, ascon_padding& C,
                                     ascon_padding& P, const ascon_data& ciphertext,
                                     ascon_data& plaintext);
    static bool Finalization(ascon_state& S, const ascon_128& keys,
                             ascon_128& T, const ascon_128& Ttmp = { 0, 0 });

    // 将内部的数据类型转成外部接口的数据类型输出
    static void transform(const ascon_padding& in, ascon_data& out, size_t l);

    // 定义常量数据
    static const permutations_type a = 12;  // permutatuions_type见上个小节
    static const permutations_type b = 6;

    static const int k = 128;  // 这里的单位都是:bits,这个后面没怎么用到
    static const int r = 64;
    static const int c = 256;  // 这个后面没有怎么用到
};
实现填充过程
// 明确数据类型,是从ascon_data转成ascon_padding,也就是外界接口的数据类型转成内部实现的数据类型
// need是表示是否需要填充,明文,关联数据都是需要填充的,指填充 100000...0
// 设置为false就是不填充,密文是不填充
void Asconv12::padding(const ascon_data& data, ascon_padding& out, bool need) {
    if (data.size() == 0) return;

    // 讲一下one_zero_Bytes,填充过程中后面需要填充 1000...000 的字节数看,上述公式就行
    size_t one_zero_Bytes = (Asconv12::r - ((data.size() * 8) % Asconv12::r)) / 8;
    one_zero_Bytes = one_zero_Bytes == 0 ? 1 : one_zero_Bytes;  // 一定要填充,而不能不填充

    // size_of_out,计算容器大小,也就是asscon_padding的大小,
    // 因为它是每行64bits=8Bytes,所以需要除以每行大小
    size_t size_of_out = need ? (data.size() + one_zero_Bytes) / 8 : (data.size() / 8 + (data.size() % 8 > 0));

    if (!out.empty()) out.clear();
    out.resize(size_of_out);
    std::fill(out.begin(), out.end(), 0);   // 将所有填充为0,作为初始化

    // ascon_data是一维的,ascon_padding是形如二维的,因为每一行都是8个字节
    // 填充时没有使用单独的一片空间将填充数据加进去,所以在这个过程进行添加
    // ascon_data mod 8并不是为0的,所以最后一行特殊处理
    for (size_t i = 0; i < size_of_out - 1; i++) {
        for (int j = 0; j < 8; j++) {
            out[i] <<= 8;
            out[i] |= (ascon_64)data[i * 8 + j];
        }
    }

    // 最后一行特殊处理,
    for (int i = 0; i < 8; i++) {
        size_t index = (size_of_out - 1) * 8 + i;
        out[size_of_out-1] <<= 8;
        if (index < data.size()) {
            out[size_of_out - 1] |= (ascon_64)data[index];
        }
        else if (index == data.size()) {
            if(need)
                out[size_of_out - 1] |= (ascon_64)0x80;
        }
    }
// 结束padding
}
实现Permutations
// 在此之前,先实现一下循环右移,其实很简单的,自己推一下就明白了
ascon_64 Asconv12::ROTR(ascon_64 d, int n) {
return ((d << (64 - n)) | (d >> n));
}
// permutations,t表示a过程还是b过程,其实就是次数不同
// 状态S时运行过程中的
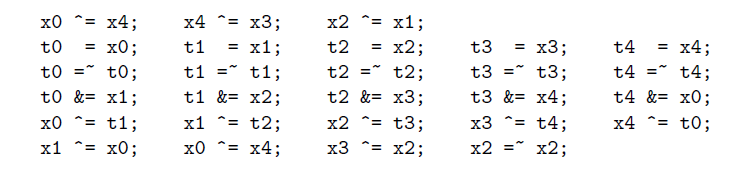
void Asconv12::permutations(permutations_type t, ascon_state& S) {
ascon_64 x0 = S[0], x1 = S[1], x2 = S[2], x3 = S[3], x4 = S[4], t0, t1, t2, t3, t4;
for (ascon_64 i = 12 - t; i < 12; i++) {
// 常量添加,注意看上述过程讲解时,常量是有规律的,这个公式也是看的官方的
x2 ^= (((ascon_64)(0xf) - i) << 4) | i;
// 替换层,直接根据公式来的
x0 ^= x4; x4 ^= x3; x2 ^= x1;
t0 = x0; t1 = x1; t2 = x2; t3 = x3; t4 = x4;
t0 = ~t0; t1 = ~t1; t2 = ~t2; t3 = ~t3; t4 = ~t4;
t0 &= x1; t1 &= x2; t2 &= x3; t3 &= x4; t4 &= x0;
x0 ^= t1; x1 ^= t2; x2 ^= t3; x3 ^= t4; x4 ^= t0;
x1 ^= x0; x0 ^= x4; x3 ^= x2; x2 = ~x2;
// 线性扩散层,直接根据公式来就行
x0 ^= Asconv12::ROTR(x0, 19) ^ Asconv12::ROTR(x0, 28);
x1 ^= Asconv12::ROTR(x1, 61) ^ Asconv12::ROTR(x1, 39);
x2 ^= Asconv12::ROTR(x2, 1) ^ Asconv12::ROTR(x2, 6);
x3 ^= Asconv12::ROTR(x3, 10) ^ Asconv12::ROTR(x3, 17);
x4 ^= Asconv12::ROTR(x4, 7) ^ Asconv12::ROTR(x4, 41);
}
// 更新状态S
S[0] = x0; S[1] = x1; S[2] = x2; S[3] = x3; S[4] = x4;
}
数据类型转换
考虑到内部实现中所用的数据类型是类二维的,外部接口都是一维的,所以需要转换
// ascon_padding 转 ascon_data,内部的转外部
// l表示padding最后一个剩余多少位
void Asconv12::transform(const ascon_padding& in, ascon_data& out, size_t l) {
    if (!out.empty()) out.clear();
    // output's Bytes
    size_t out_size = ((in.size() - 1) * 64 + l) / 8;
    out.resize(out_size);

    // 最后一行单独处理,因为最后一行其实只有lbits数据,不是1是l
    for (int i = 0; i < in.size() - 1; i++) {
        for (int j = 0; j < 8; j++) {
            out[i * 8 + j] = (ascon_8)(in[i] >> ((7 - j) * 8));
        }
    }

    for (int i = 0; i < l / 8; i++) { // 最后一行数据特殊处理,只有 l/8个字节的数据
        out[8 * (in.size() - 1) + i] = (ascon_8)(in[in.size() - 1] >> ((7 - i) * 8));
    }
}
Initialization
// 不要纠结单词打错了
// 初始化
void Asconv12::Initalization(ascon_state& S, const ascon_128& keys, const ascon_128& nonce) {
    if (!S.empty())S.clear();
    S.resize(5);
    S[0] = 0x80400c0600000000; // Ⅳ:k || r || a || b || 0^{288-2k},就固定使用就行
    keys.copyto64(S[1], S[2]);
    nonce.copyto64(S[3], S[4]);

    Asconv12::permutations(Asconv12::a, S); // p^a操作

    keys.xorwith64(S[3], S[4]); //
}
Processing Associated Data
// 处理关联数据
void Asconv12::ProcessingAssociatedData(
    ascon_state& S,   // 状态S
    ascon_padding& A, // 内部的填充数据,其实发现这里不用传参也行的,后续再优化
    const ascon_data& associatedData // 外部传入的关联数据
){
    padding(associatedData, A); // 填充数据
    if (!A.empty()) {
        for (int i = 0; i < A.size(); i++) {
            S[0] ^= A[i];
            Asconv12::permutations(Asconv12::b, S);
        }
        S[4] ^= (ascon_64)0x1;
    }
}
Processing Plaintext
// 处理明文
void Asconv12::ProcessingPlaintext(
    ascon_state& S, // 状态S
    ascon_padding& P, // 明文的内部数据,其实发现这里不用传参也行,后续再优化
    ascon_padding& C, // 密文的内部数据,其实发现这里不用传参也行,后续再优化
    const ascon_data& plaintext, // 外部输入的明文
    ascon_data& ciphertext // 输出的密文
) {
    padding(plaintext, P);
    if (!C.empty()) C.clear();
    C.resize(P.size());
    // 计算l
    size_t l = plaintext.size() * 8 % Asconv12::r;
    for (int i = 0; i < P.size(); i++) {
        C[i] = S[0] ^ P[i];
        S[0] = C[i];
        if (i < P.size() - 1) {  // 处理前 t-1 个数据
            Asconv12::permutations(Asconv12::b, S);
        }
        else { // 最后一个数据特殊处理
            C[i] &= ((0xFFFFFFFFFFFFFFFF >> (64 - l)) << (64 - l));
        }
    }

    // ascon_padding transform to ascon_data
    Asconv12::transform(C, ciphertext, l);
}
Process Ciphertext
// 处理密文
void Asconv12::ProcessingCiphertext(
    ascon_state& S,  // 状态S
    ascon_padding& C, // “填充”的密文数据,其实只是为了让它最后满足64bits而已,但是其实后面的0没用
    ascon_padding& P, // 内部的明文数据,可去,后面优化
    const ascon_data& ciphertext, // 外部数据的密文数据
    ascon_data& plaintext // 输出到外部的明文数据
) {
    padding(ciphertext, C, false);
    if (!P.empty()) P.clear();
    P.resize(C.size());
    for (int i = 0; i < C.size()-1; i++) {
        P[i] = S[0] ^ C[i];
        S[0] = C[i];
        Asconv12::permutations(Asconv12::b, S);
    }
    int index = C.size() - 1;
    size_t l = ciphertext.size() * 8 % Asconv12::r;

    // 这一段看公式自己写会更好
    // 本质也就是操作S前r个数据也即是S[0]
    P[index] = ((S[0] >> (64 - l)) << (64 - l)) ^ C[index];
    S[0] = C[index] // Ct是前面l个数据加r-l个0,
        |  // 取或就相当于拼接
        (((S[0] << l) >> l) ^ ((ascon_64)1 << (63 - l)));

    // 感觉不太好解释,但是反正实现那个公式肯定不止这一种方法的

    Asconv12::transform(P, plaintext, l);
}
Finalization
// 终止化
bool Asconv12::Finalization(
    ascon_state& S, // 状态S
    const ascon_128& keys, // 密钥
    ascon_128& T,  // 计算出来的标志
    const ascon_128& Ttmp // 加密过程这个参数用不到,或者说不管他,解密过程表示接收到的标志
) {
    keys.xorwith64(S[1], S[2]);
    Asconv12::permutations(Asconv12::a, S);
    T.high = S[3] ^ keys.high;
    T.low = S[4] ^ keys.low;
    return T==Ttmp; // 解密的时候需要判断一下标志是否相等
}
加密和解密
调用上述过程就行
void Asconv12::encryption(const ascon_data& plaintext, const ascon_data& associatedData, ascon_data& ciphertext, const ascon_128& keys, const ascon_128& nonce, ascon_128& T) {
    ascon_padding P;
    ascon_padding C;
    ascon_padding A;
    ascon_state S;
    // 初始化
    Asconv12::Initalization(S, keys, nonce);
    // 处理关联数据
    Asconv12::ProcessingAssociatedData(S, A, associatedData);
    // 处理明文
    Asconv12::ProcessingPlaintext(S, P, C, plaintext, ciphertext);
    // 终止化
    Asconv12::Finalization(S, keys, T);
}

bool Asconv12::decryption(const ascon_data& ciphertext, const ascon_data& assonciatedData, ascon_data& plaintext, const ascon_128& keys, const ascon_128& nonce, ascon_128& T) {
    ascon_padding P;
    ascon_padding C;
    ascon_padding A;

    ascon_state S;


    // 初始化
    Asconv12::Initalization(S, keys, nonce);
    // 处理关联数据
    Asconv12::ProcessingAssociatedData(S, A, assonciatedData);
    // 处理密文
    Asconv12::ProcessingCiphertext(S, C, P, ciphertext, plaintext);
    // 终止化
    ascon_128 Tout;
    bool flag = Asconv12::Finalization(S, keys, Tout, T);

    return flag;
}
结束语
这个算法是一个比较新颖的算法,至今国内还没有很多的资料。考虑到毕设可能用到这个,所以特地写了一份参考教程。要是有问题就在评论区问吧,我也是才学,可以一起 交流交流。