
前言(博客未完结)
-
我的软硬件
树莓派与电脑网线连接
树莓派4B
电脑Windows10
电脑上已经有了Clash -
以下问题,我无法解答
树莓派官网打不开
openwrt官网打不开
GitHub登不上 -
软件资源
可以私聊我获取(无偿)
私聊任何方式都行,看到会回,没回就是没看到
下载
下载适用于树莓派的openwrt系统
链接:点击下载
sysupgrade和factory固件的区别:后者是原厂固件,前者是升级的固件,我选择factory
ext4和squashfs区别:ext4是可更改,squashfs可以恢复出厂设置
烧录
就正常烧录,用win32diskimager
下载软件
电脑ssh登录
依然是共享网络先,注意: 因为我是用电脑给树莓派供网的,所以是需要这么共享,有些直接用路由器供网就不需要设置,直接SSH登录即可
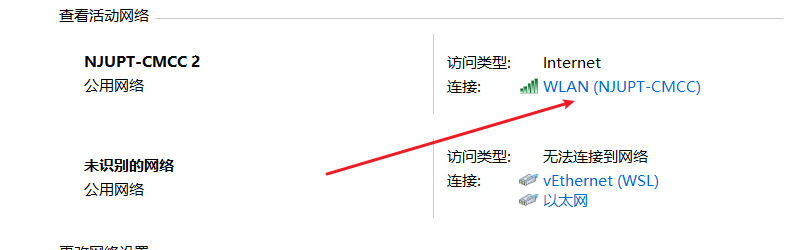
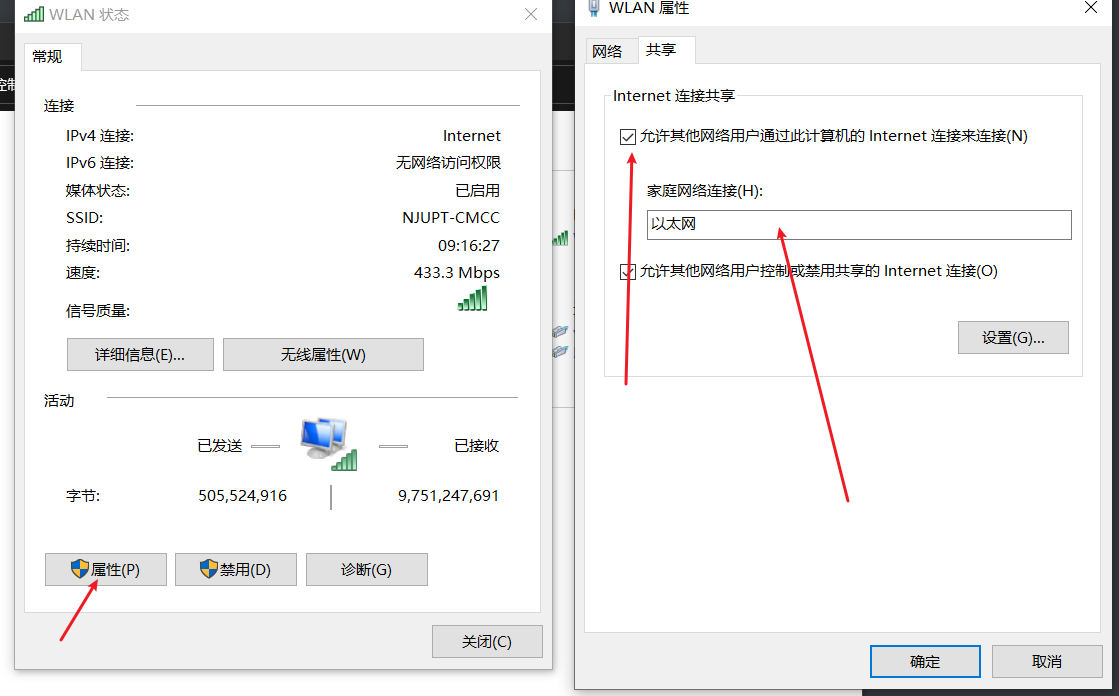
然后,共享给以太网,因为我是有网线给树莓派供网的,但是如果是其他的,请自行设置。
话不多说,看图就行
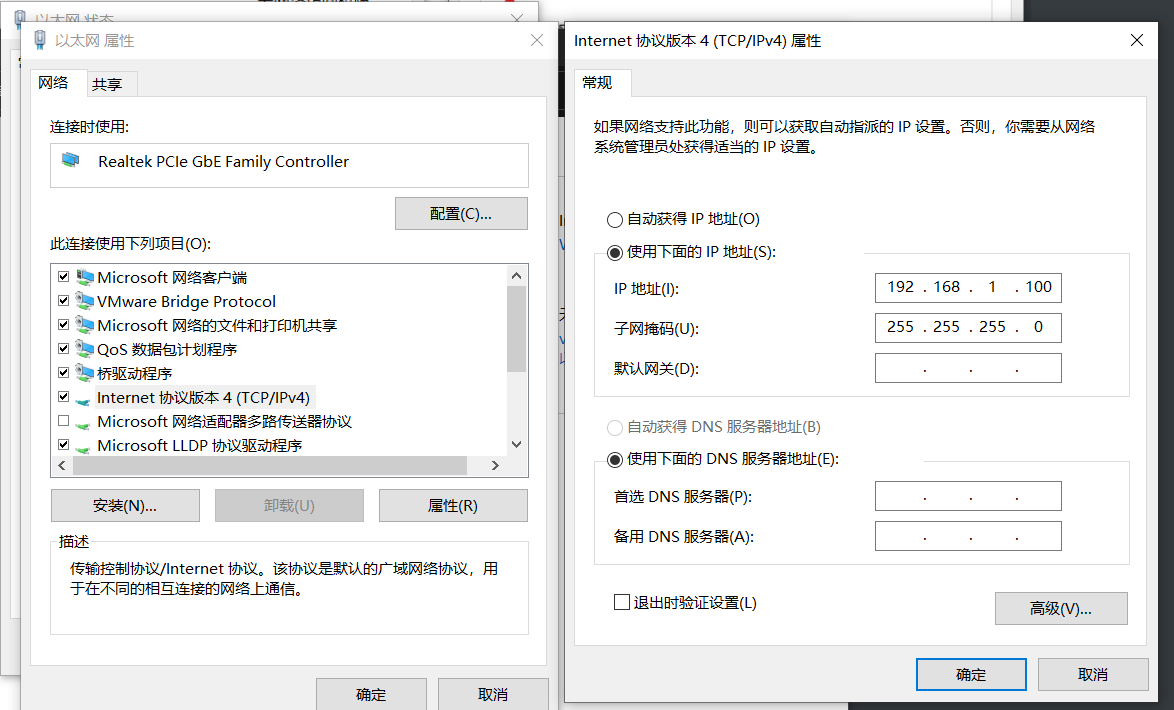
解释一下上面的配置
- 首先,
openwrt默认适用IP地址192.168.1.1 - 所以,我们需要把笔记本的网络也设置到
192.168.1.x - 最后,适用
ssh登录到openwrt ssh root@192.168.1.1
openwrt上面的配置
# 查看一下IP
ifconfig

# 显示
root@OpenWrt:~# ifconfig
br-lan    Link encap:Ethernet  HWaddr DC:A6:32:E1:5C:07
          inet addr:192.168.1.1  Bcast:192.168.1.255  Mask:255.255.255.0
          inet6 addr: fe80::dea6:32ff:fee1:5c07/64 Scope:Link
          inet6 addr: fd59:2531:a821::1/60 Scope:Global
          UP BROADCAST RUNNING MULTICAST  MTU:1500  Metric:1
          RX packets:31219 errors:0 dropped:0 overruns:0 frame:0
          TX packets:40578 errors:0 dropped:0 overruns:0 carrier:0
          collisions:0 txqueuelen:1000
          RX bytes:3711156 (3.5 MiB)  TX bytes:6841056 (6.5 MiB)

eth0      Link encap:Ethernet  HWaddr DC:A6:32:E1:5C:07
          UP BROADCAST RUNNING MULTICAST  MTU:1500  Metric:1
          RX packets:31228 errors:0 dropped:0 overruns:0 frame:0
          TX packets:40578 errors:0 dropped:0 overruns:0 carrier:0
          collisions:0 txqueuelen:1000
          RX bytes:4149112 (3.9 MiB)  TX bytes:6841056 (6.5 MiB)

lo        Link encap:Local Loopback
          inet addr:127.0.0.1  Mask:255.0.0.0
          inet6 addr: ::1/128 Scope:Host
          UP LOOPBACK RUNNING  MTU:65536  Metric:1
          RX packets:2197 errors:0 dropped:0 overruns:0 frame:0
          TX packets:2197 errors:0 dropped:0 overruns:0 carrier:0
          collisions:0 txqueuelen:1000
          RX bytes:243060 (237.3 KiB)  TX bytes:243060 (237.3 KiB)

##############  让我们略过这里
arp # 查看路由表
IP address       HW type     Flags       HW address            Mask     Device
192.168.1.100    0x1         0x2         d8:d0:90:1f:20:b1     *        br-lan
#### 找到笔记本IP了


## 查看路由和网关信息
route
Kernel IP routing table
Destination     Gateway         Genmask         Flags Metric Ref    Use Iface
192.168.1.0     *               255.255.255.0   U     0      0        0 br-lan
# 看得出,上面没有 Gateway

# 添加 gateway(网关)
route add default gw 192.168.1.100

# 然后 ping baidu.com 发现还是不行

# 更改域名服务器
vim /etc/resolv.conf

# 在后面添加下列代码并且注释掉127.0.0.1和::1两行
nameserver 192.168.1.100  # 这个是笔记本地址
nameserver 114.114.114.114  # 这个是公共域名解析服务器

# 重新加载/etc/resolv.conf
. /etc/resolv.conf

# 然后ping baidu.com
ping baidu.com  # 可以ping通
设置一下代理或换源
由于某些原因导致我们不能访问openwrt的官网,因此采取换源的措施
# 换清华源
cd /etc/opkg  # 这里目录下就是你的源地址了
ls # 目录下有个distfeeds.conf文件

# 建议先备份
cp distfeeds.conf distfeeds.conf.bak

# 使用清华源
sed -i 's_https\?://downloads.openwrt.org_https://mirrors.cernet.edu.cn/openwrt_' /etc/opkg/distfeeds.conf
安装一些软件
- 安装
luci:这个是图形化配置软件,可以之后直接在浏览器中登录192.168.1.1进行图形化配置 - 安装
o p e n c l a s h:Github链接
opkg update  # 更新软件包
opkg install luci
# 我采取离线下载模式
# 直接下载 luci-app_openclash_xxxx.ipk
# 找个ftp工具传上去
# 然后执行
opkg install luci-app_openclash_xxx.ipk

# 注意自己下载文件名,上面不要直接复制粘贴,这将会不成功


# 然后发现安装失败,出现如下情况
check_data_file_clashes: Package dnsmasq-full wants to install file /etc/hotplug.d/ntp/25-dnsmasqsec But that file is already provided by package  * dnsmasq

# 我们查看Issues得知 : https://github.com/vernesong/OpenClash/issues/923
# 进行如下操作
opkg update
opkg remove dnsmasq && opkg install dnsmasq-full  # 卸载和安装需要同时进行,不懂为啥

# 注意,需要重新配置 nameserver
# 更改域名服务器
vim /etc/resolv.conf

# 在后面添加下列代码
nameserver 192.168.1.100  # 这个是笔记本地址
nameserver 114.114.114.114  # 这个是公共域名解析服务器

opkg remove dnsmasq && opkg install dnsmasq-full  # 卸载和安装需要同时进行,不懂为啥
# 安装 dnsmasq-full 完成

# 安装依赖
opkg install coreutils-nohup bash dnsmasq-full curl ca-certificates ipset ip-full libcap libcap-bin ruby ruby-yaml kmod-tun kmod-inet-diag unzip kmod-nft-tproxy luci-compat luci luci-base

# 然后再重新安装
opkg install luci-app_openclash_xxx.ipk
安装中文
opkg install luci-i18n-base-zh-cn
GUI配置
打开浏览器
在浏览器输入你的openwrt的IP地址:192.168.1.1
配置接口
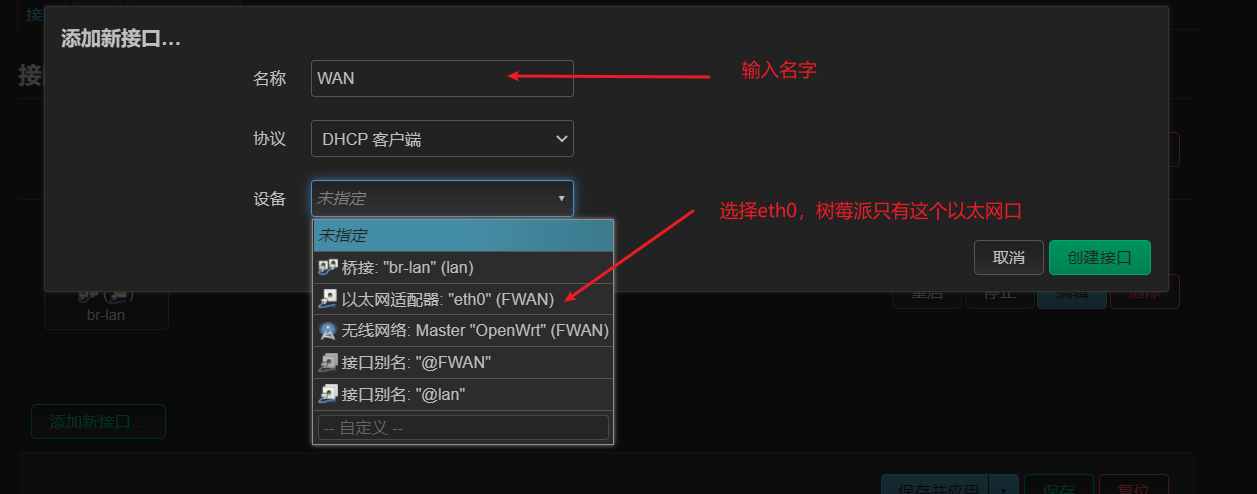
我将使用树莓派唯一的以太网口作为wan口,而WiFi作为lan。
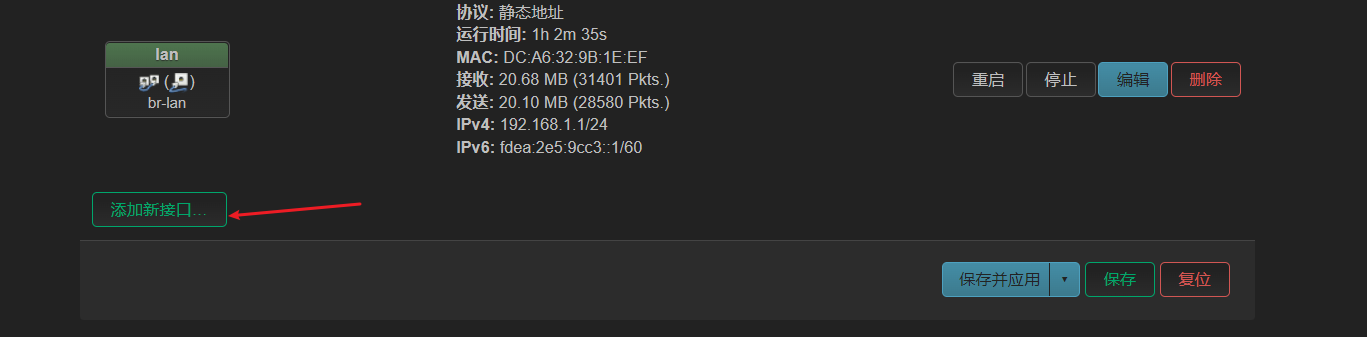
配置以太网WAN
点击接口
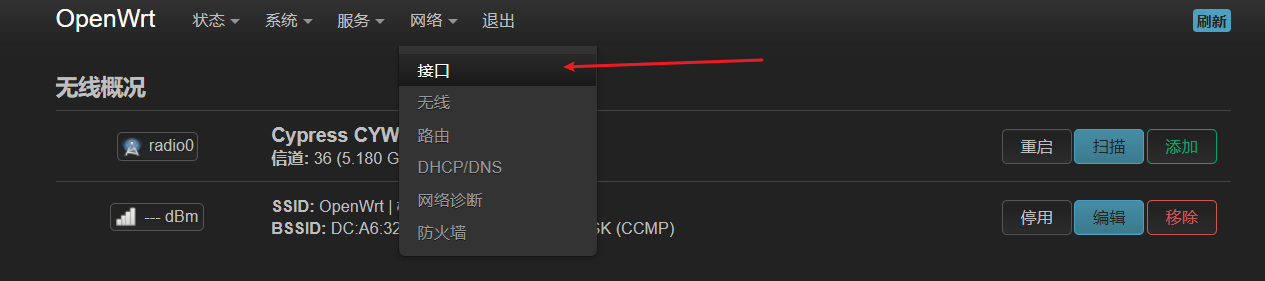
添加接口

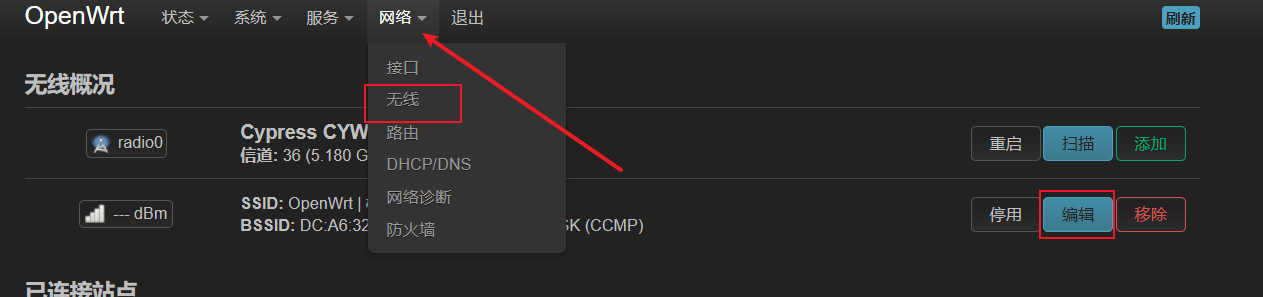
配置WiFi
点击编辑,编辑WiFi
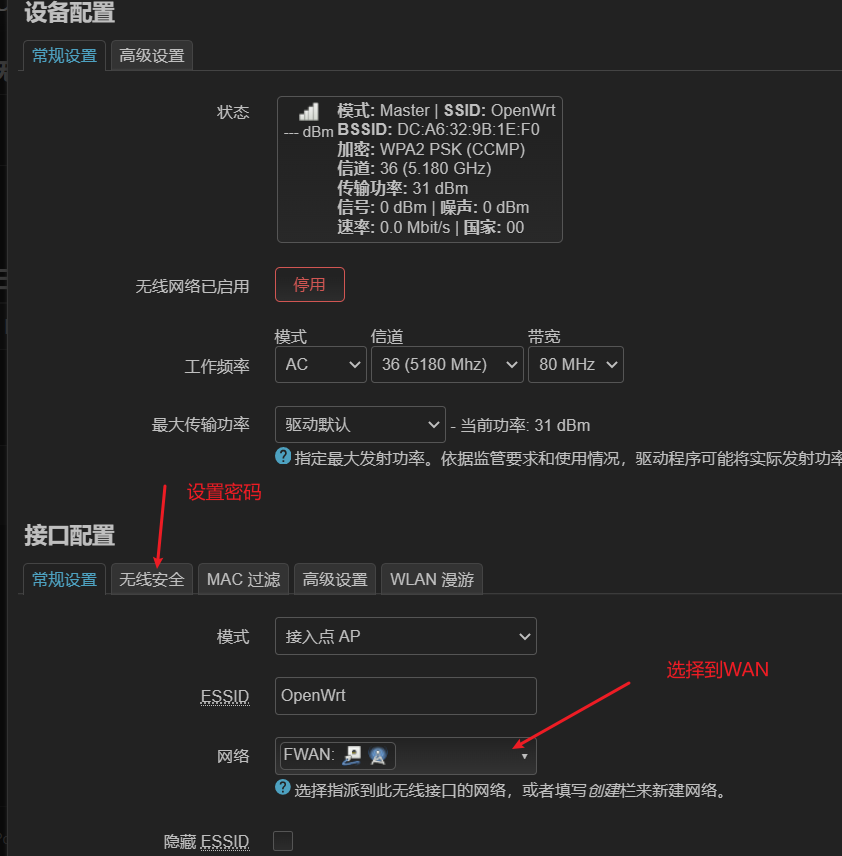
密码设置
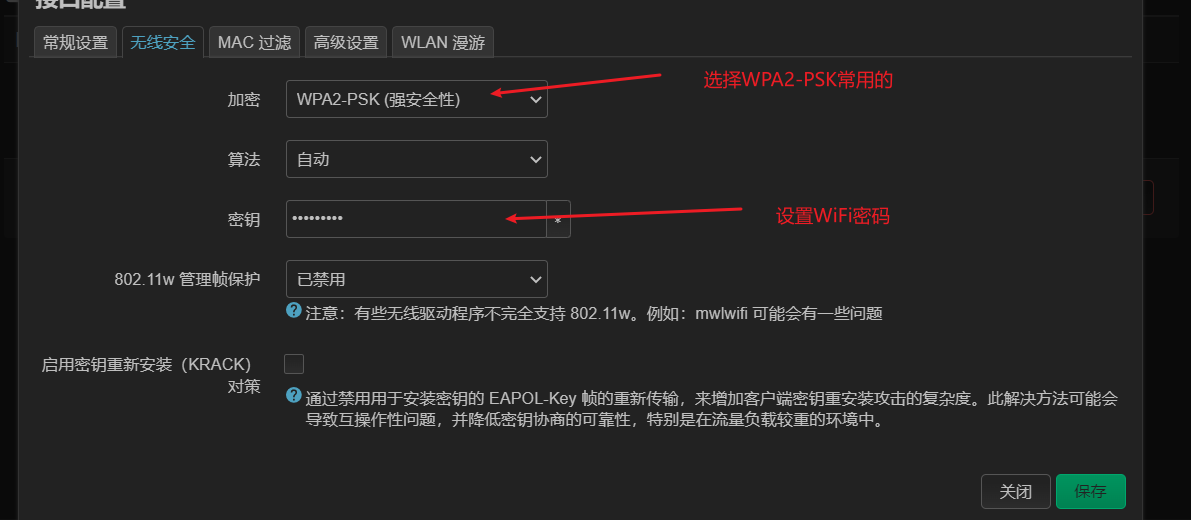
保存之后,点击启用,我这里是启用之后的,然后用手机测试一下是否能够连接到WiFi

保存所有的更改
在任意有保存并应用的界面都可以进行保存

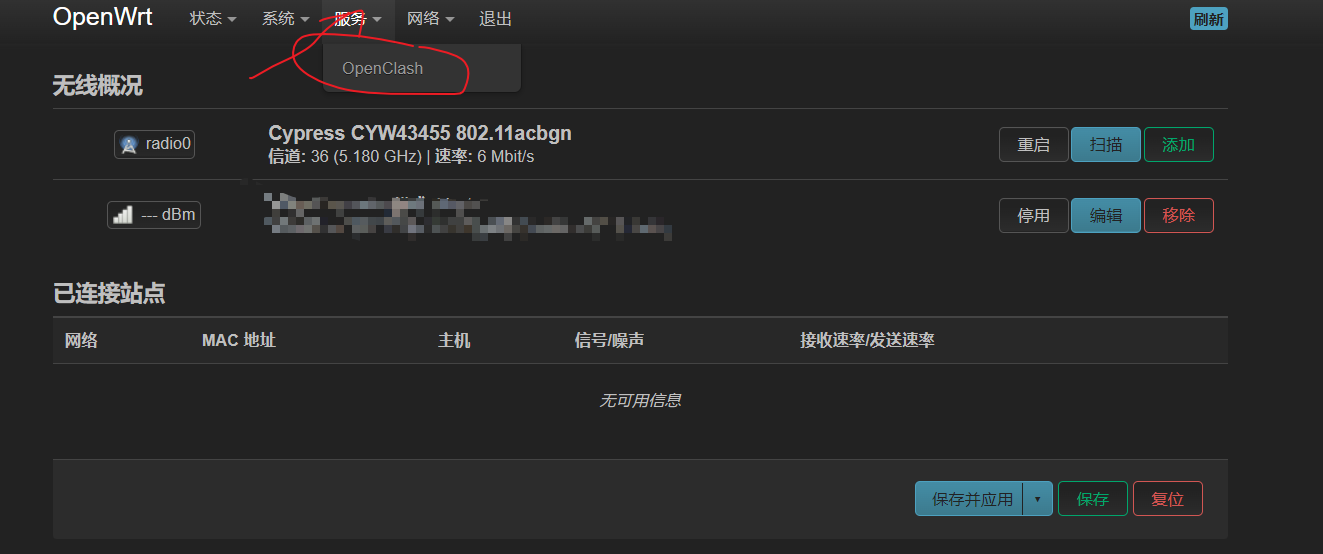
配置Open c l a s h
如果安装好了,按理说这里有个o p e n c l a s h,没有的话,可以重启树莓派或者刷新一下网页
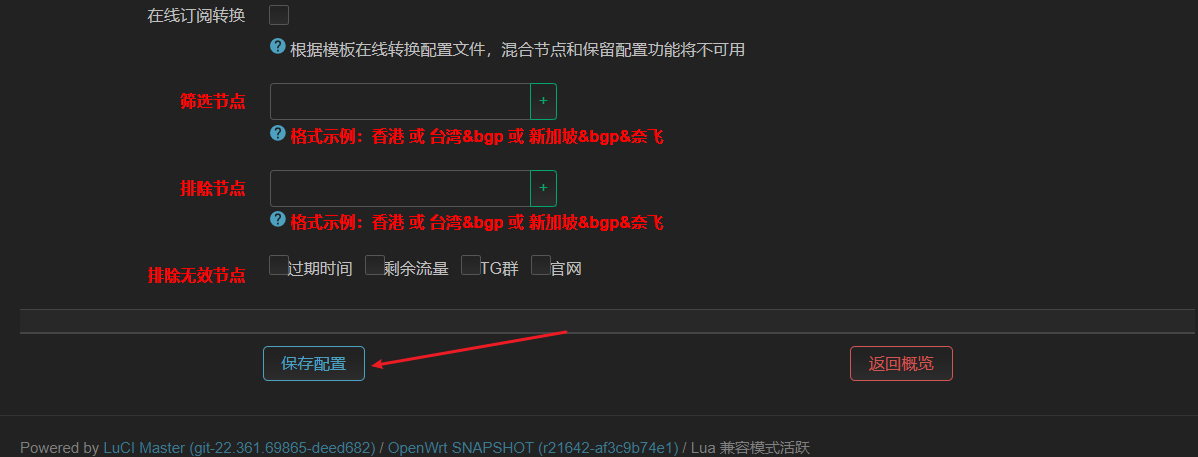
配置节点文件
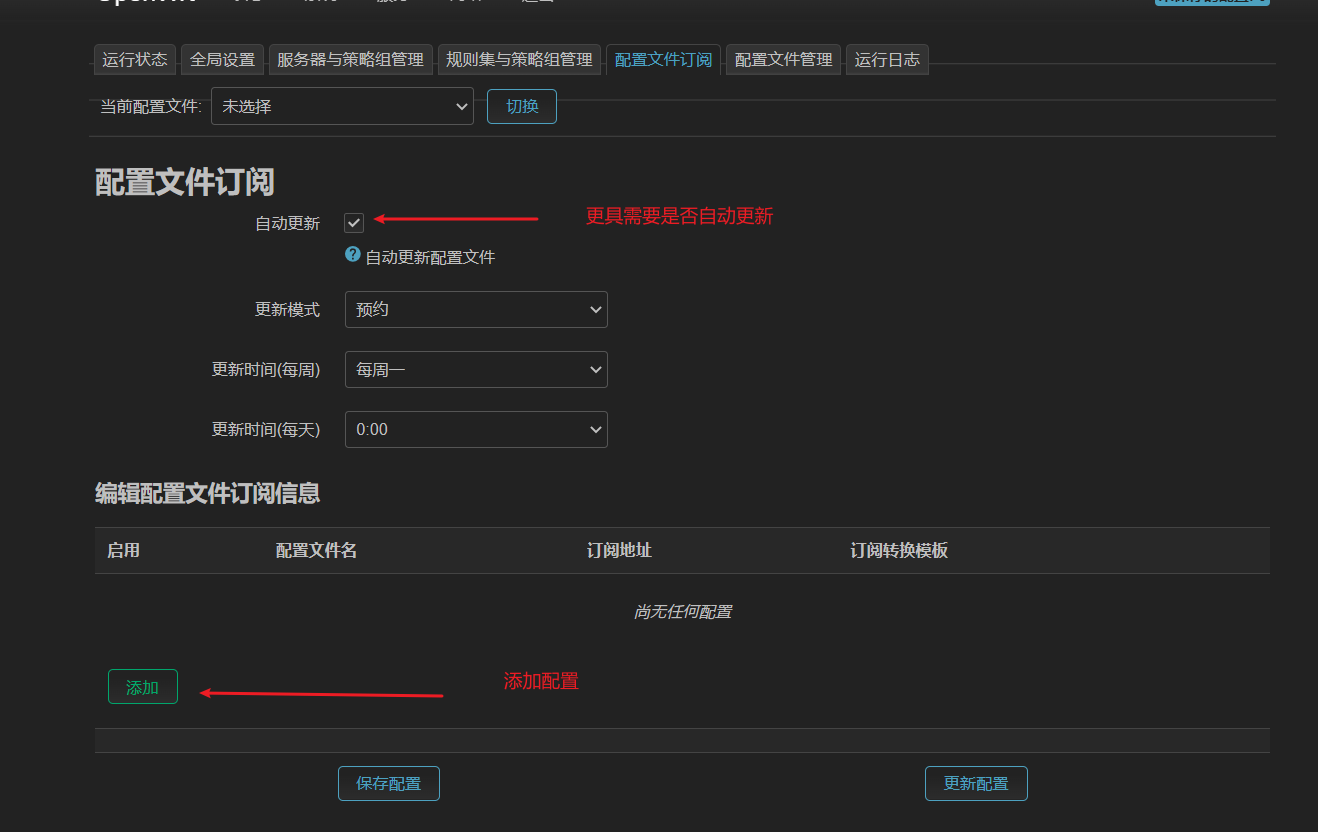

滑倒下面
启用

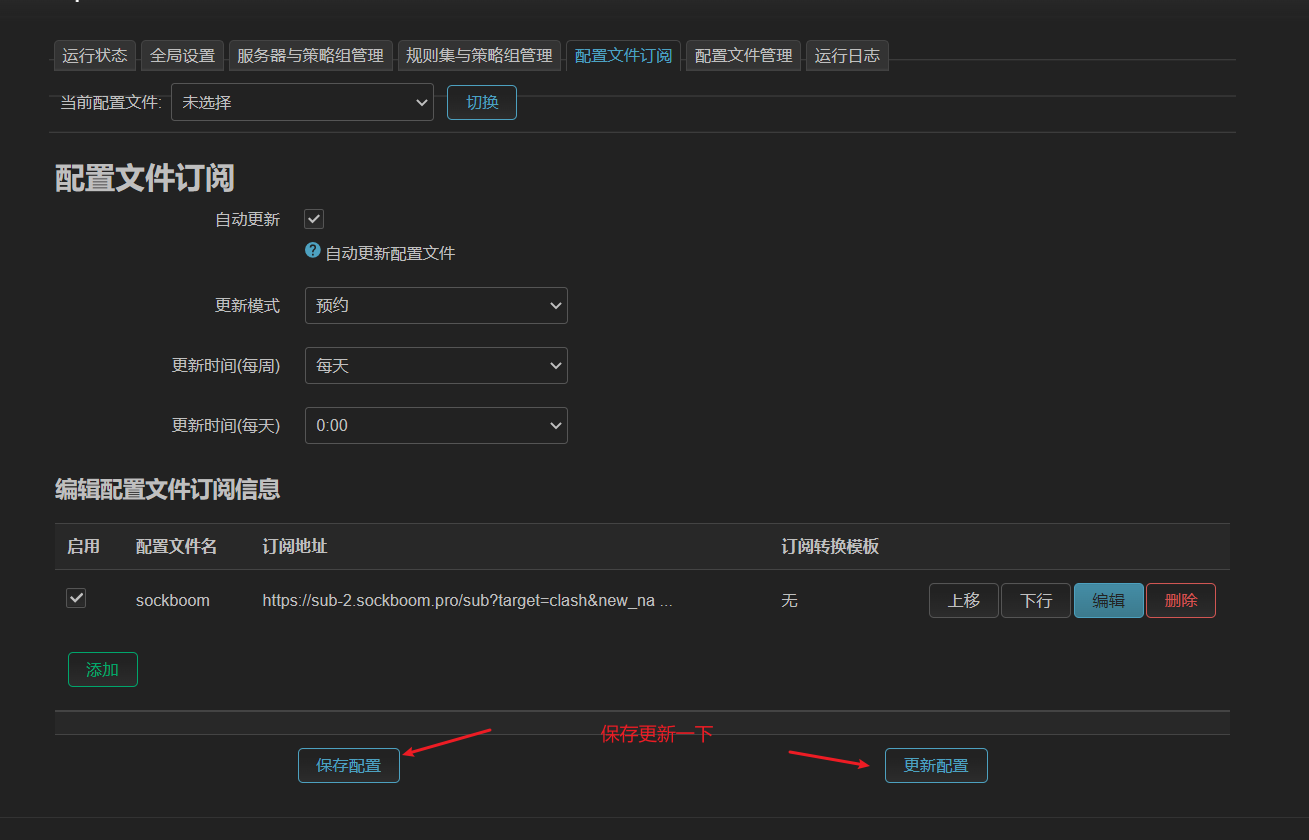
配置文件订阅
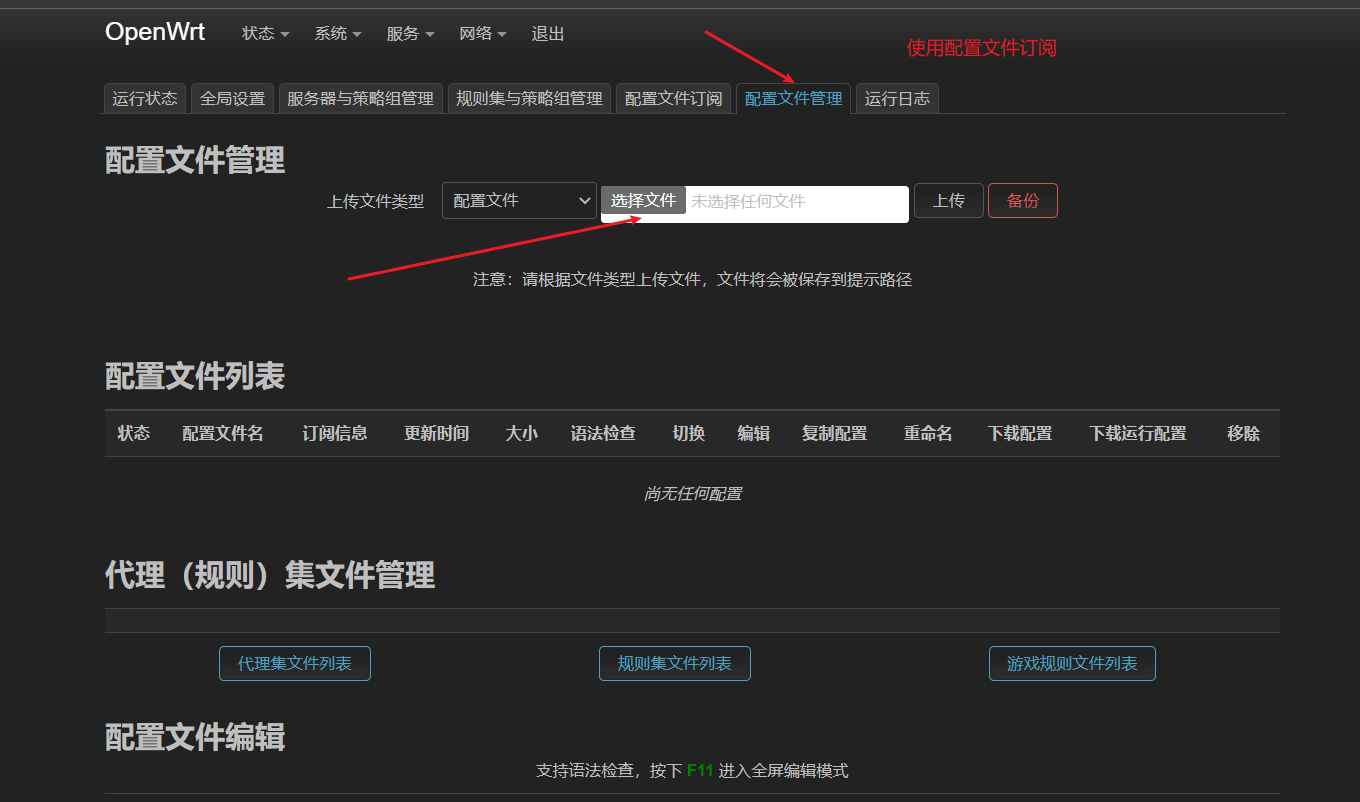

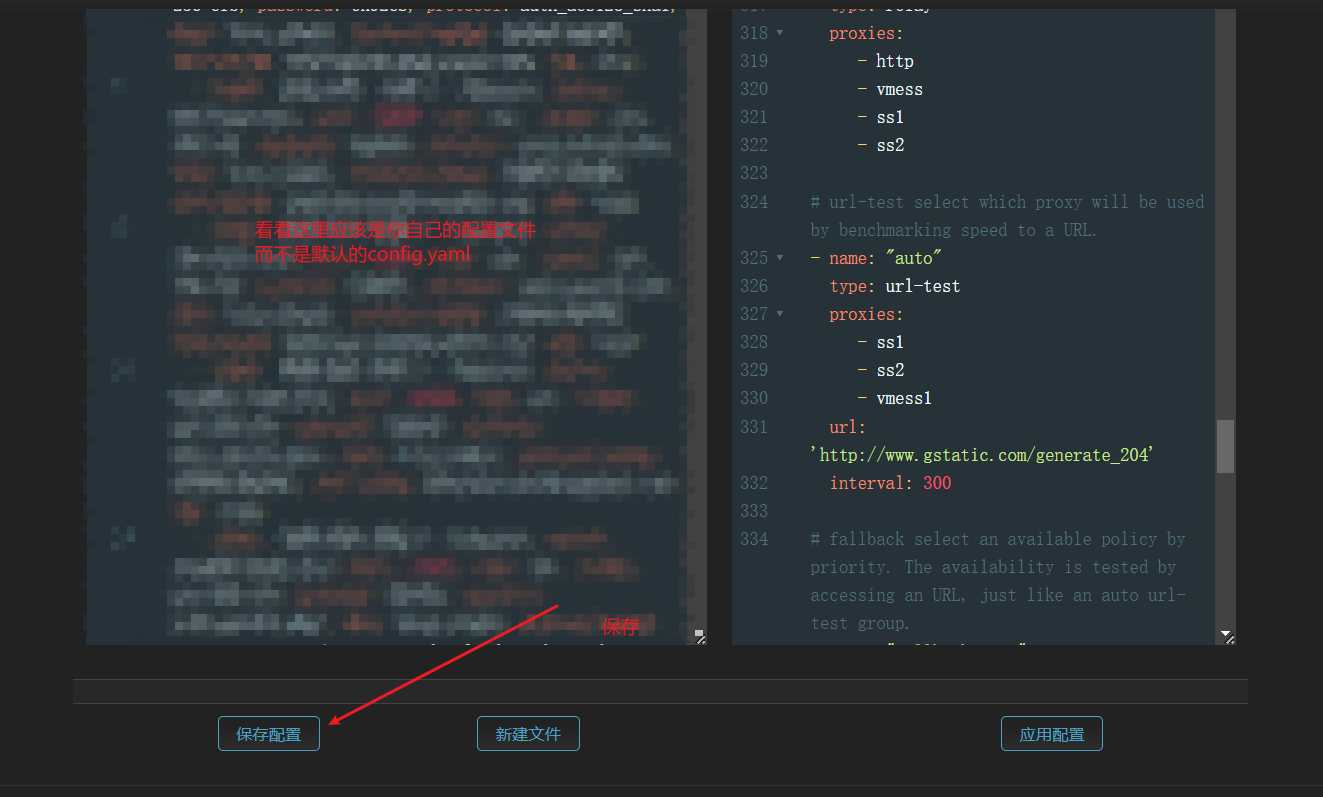
查看配置文件并保存
访问出现问题
# 浏览器输入192.168.1.1
# 出现如下问题:
/usr/lib/lua/luci/controller/openclash.lua:91: module 'luci.cbi.datatypes' not found:
# 执行下列命令
opkg install luci-compat